
How-To: Build your own NAS server with the RockPro64
by Mikeal Tadeo
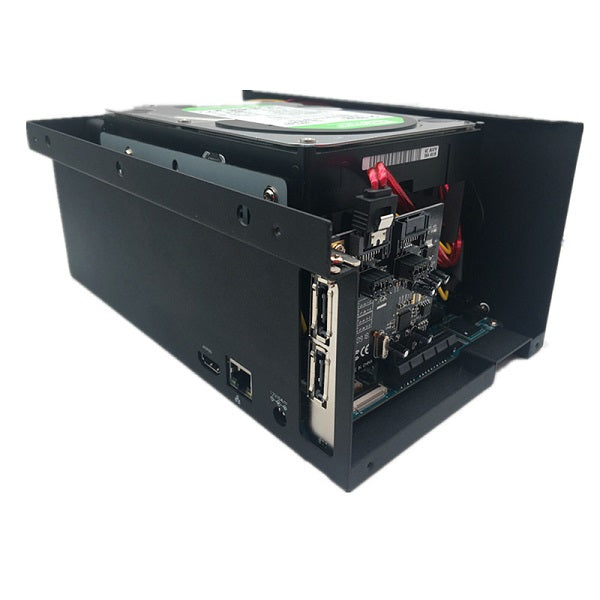
Have you ever wanted your own personal server? Look no further! Setting up your own home server is simple with the RockPro64 and the RockPro64 NAS case.
Some of the benefits of building your own NAS instead of buying one off-the-shelf are:
- Customizable features and capacities
- Utilization of non-proprietary parts and software
- Future upgradeability
- Learning some new skills!
Required items:
- RockPro64 SBC - https://ameridroid.com/products/rockpro64
- RockPro64 heatsink - https://ameridroid.com/products/rockpro64-heatsink
- RockPro64 Metal Desktop/NAS Case - https://ameridroid.com/products/rockpro64-metal-desktop-nas-casing
- RockPro64 Metal Desktop/NAS Case Fan - https://ameridroid.com/products/fan-for-rockpro64-metal-desktop-nas-case
- 12V/5A Power supply - https://ameridroid.com/products/12v-5a-power-supply-us-plug
- RockPro64 PCI-E to Dual SATA-II Interface card - https://ameridroid.com/products/rockpro64-pci-e-to-dual-sata-ii-interface-card
- One 2.5 or 3.5 inch HDD (It is strongly suggested that you use two)
- One microSD card - https://ameridroid.com/products/sandisk-ultra-microsdhc-uhs-1-card
- Ethernet cable
After you have completed the assembly of your RockPro 64 NAS case (See assembly video here if you need assistance with assembly), you will need to write your microSD with OpenMediaVault. OpenMediaVault provides an exceptional way to set up your NAS through a web interface.

Create your image by downloading the image, located here and flash that image to your microSD. It is recommended you use Etcher. After you have finsihed flashing the image, you can then insert your microSD card into the RockPro64. Next, connect the ethernet cable to your RockPro64 and connect your power cord. After a short moment, your RockPro64 should be visible on your network. A quick and easy way to discover your RockPro64’s IP address is to use a program such as Angry IP Scanner. Once you have figured out your IP address, you can type it into any web browser and move on to the next step.
Note: you will need to figure out your own IP address for your RockPro64. I highly suggest that you create a static IP address for your RockPro64. The process for this varies depending on what router you have.
The default login for OpenMediaVault are:
Username: admin
Password: openmediavault
Once you login, you will have a list of options on the left and the selection present on the right window.

At this point I strongly suggest that you change the default login for the system. On the left menu, navigate to System>General Settings then on the top, select Web Administrator Password. Once you have changed the password, you can continue on to the next step.
To set up a raid, navigate to Storage>RAID Management. Select Create, give your RAID a name, select a RAID type (in this guide we will be using Mirrored RAID) and select the devices to be used in the raid.

Creating the RAID may take some time.
After you have finished creating the RAID, you can then set up your File System. Navigate to Storage>File Systems, and select Create. You will need to select what device to create the file system on, in this case our newly created RAID, give it a label, and then select what type of file system type you want. For this demonstration, we will use EXT4.

After creating a file system, you can then create folders and shares.
First, navigate to Services>SMB/CIFS in order to activate Windows shares. Toggle Enable to activate, and save your settings.

Next, click the Shares tab at the top, then click Add to create a shared folder.

Click on the + to the right under the Shared Folder field, to create (or select) a folder to share. Give the folder a name, select its device, select the path (if none is given, will auto-fill), select permissions, then hit save. Make sure to apply changes when prompted.

Next, users will be created to access the folders. Navigate to Access Rights Management>User and select Add. Give the user a name and password and hit save.

On the same page, select Privileges at the top. Select what folders you would like the user to be able to have access to and what kinds of access.

One last thing to do is to create a Hostname for your NAS. Navigate to System>Network, then on the General tab, give your NAS a Hostname.

Next, you can map the network drive in Windows.
Navigate to This PC and on the top tabs, select Computer, then Map Network Drive. You can select the drive letter (if applicable) and the folder. If you do not know the path to your folder, select Browse.


Select your network location and Windows should prompt you to enter your username and password. Enter the credentials we created earlier
After a short delay, folders should appear under our network drive. Select the folder to map and then the path should populate. You can skip this step if you know the path (in this case, the path is \\Data\Example).

Hit finish and you’re all set up. The drive should be visible in This PC and under Network and you can begin moving files into it.
Not only have you created your own NAS, you have also created one that can be maintained and upgraded without relying on proprietary parts and software. Proprietary components can be expensive or impossible to acquire, and documentation can be limited or non-existent.